Pages

Welcome to My Blog

This is to share my IT experience with friends all around the world.
I have been working in Linux Fedora Systems for more than 8 years. Its fun to share knowledge and learn..
As everyone knows when a problem arises in your systems "googling" is the way that many depend on..

All the posts here are my working experiences during my working life.. So you can count on it..

I have added the references where I got help in solving IT issues


Monday, November 21, 2011

BIND Update Issue

We have experienced a specific issue when we try to upgrade the bind version (from current to latest) in BIND DNS servers. As we noticed the location of the executable binaries ( named, dns-key etc) is changed (i.e /usr/sbin OR /usr/local/sbin) depending on the way you installed bind.
(i.e. From RPMs/ yum OR install from the source code)

You can check the location using following command
 which named 

The output will be somewhat like /usr/sbin/named or /usr/local/sbin/named as mentioned above.

When you try to upgrade bind with source code, by default the executable location will be /usr/local/sbin and you will ended up with server failure when restart the service.


The solution is as follows
First you need to download the source code and untar it to your home directory

wget -b source_code_url 
tar -xzvf bind-9.x.x.tar.gz

If your executable location is /usr/sbin you have to compile the source code with following parameters
./configure --sbindir=/usr/sbin

Then issue make and make install commands to install the new version
make
make install

Check whether it has upgraded using named -v command
named -v

Now restart the service ( server named restart OR /etc/init.d/named restart)

Note: If you have a doubt about what you will get after the upgrade... tar your executable folder and keep as a backup. You can have your old version once you untar the contents in the backed up and replaced it.


Tuesday, November 15, 2011

3 Steps to Perform SSH Login Without Password Using ssh-keygen & ssh-copy-id

Good Reference:
3 Steps to Perform SSH Login Without Password Using ssh-keygen & ssh-copy-id

Nice article which tells how you can configure ssh remote login without passwords.
I tried it with Ubuntu client and logged in to remote Fedora server without any issue.

Just one clarification: When you create the public and private keys using ssh-keygen command, if you enter a pass phrase it will be prompt at the login. So better to leave a blank when generating the keys.

Then copy the public key using following command as given in the link 

ssh-copy-id -i ~/.ssh/id_rsa.pub <remote_host_ip>


I had an issue when login to a Fedora server from another fedora host as I used a pass-phrase when generating the keys.

I found another issue with ssh-copy-id command, due to permissions/settings issue at the remote host, I was not able to use ssh-copy-id command to copy the public key.

I followed the below given steps and enable remote login with publickey authentication.

1. Copy the id_rsa.pub to the remote key using scp command
2. Login to the remote host with ssh
3. Make the .ssh folder in the home directory (If not available)
4. Append the id_rsa.pub to the .ssh/authorized_keys file (If authorized_keys file is not available, add the contents in the id_rsa.pub to it)

At the same time, check whether the sshd process is accepting the publickey authentication. ( Check the /etc/ssh/sshd_config file and enable it as follows)
"RSAAuthentication yes
PubkeyAuthentication yes
AuthorizedKeysFile      %h/.ssh/authorized_keys

Good reference on issues of ssh_copy_id
http://superuser.com/questions/189376/ssh-copy-id-does-not-work


Tuesday, September 20, 2011

Run Postfix in both IPv6 and IPv4

If you want to set your Postfix server to listen on its IPv4 and IPv6 addresses, please add the following line to /etc/postfix/main.cf

inet_protocols = ipv4, ipv6

Restart the server (/etc/init.d/portfix restart) - reload will not work for this setting

Check whether the service is listen on both IPv4 and IPv6
Use netstat -nat command and you should get all services including following lines
tcp        0      0 0.0.0.0:25     0.0.0.0:*                   LISTEN     
tcp        0      0 :::25              :::*                    LISTEN


Note
Hope you have properly configured an IPv6 and IPv4 addresses to the server interface card with proper routing/GW settings

Friday, September 16, 2011

Simple NAT64 Setup


Configuring a Proxy server with IPv6/IPv4 connectivity will not enable IPv6 only users to access resources other that web (http, https, ftp etc). For example a printer with Ipv4 only connectivity or a POP server with Ipv4 only will not be accessible through a proxy server. What you can do to enable IPv4 accessibility from IPv6 only network?

When we had this issue we thought of implementing NAT-PT server in our IPv6 network but as stated NAT -PT is depreciate by RFC 4966 due to number of issues in NAT-PT

Then we tried NAT64 with DNS64. We obtained an open source NAT64 gateway live CD from Ecdysis http://ecdysis.viagenie.ca/ and installed it on a server. It is running on a customized fedora OS. The system architecture of NAT64 can be given as follows.
+-------------+
                            +-------------------------+IPv6 Internet|
                            |                         +-------------+
                            |          +-----+
                 +------+   |     +----+NAT64+----+
       IPv6 host-+      |   |    /     +-----+     \  +-------------+
                 | CPE  +--IPv6-<                   >-+IPv4 Internet|
       IPv6 host-+router|        \ +-------------+ /  +-------------+
                 +------+         ++DNS rewriting|+
                                   +-------------+
This is from http://www.viagenie.ca/ietf/draft/draft-wing-nat-pt-replacement-comparison-02.txt 
 
The steps we followed in configuring NAT64/DNS64 are as follows

Settings at the NAT64/DNS64 Gateway
  • Install the NAT64 server on a PC with 2 interface cards
  • Login to the server and configure the interfaces with IPv4 and IPv6 addresses according to the network setup
  • Run the provided script magic-quick-start.sh
  • Check the network configurations 
    • You should observe a nat64 interface when you run ifconfig
  • Set the firewall rules in iptables and ip6tables
  • This is important as many attacks may come thro

Settings at your IPv6 clients
  • Set the DNS server as the NAT64 servers IPv6 address
  • Add a route for 64:ff9b::/64 to the NAT64 gateway IPv6 address
After all you can verify the settings at the clients end by querying IPv4 only resource with AAAA

e.g. dig chamaradisanayake.blogspot.com AAAA

(Here chamaradisanayake.blogspot.com does not have IPv6 address but we are asking to get an IPv6 address from the NAT64/DNS64 gateway)

If every thing is fine you should get an answer as 

chamaradisanayake.blogspot.com. 929 IN CNAME blogspot.l.google.com.

blogspot.l.google.com. 139 IN AAAA 64:ff9b::d155:af84


Here 64:ff9b:: is the DNS prefix added by the DNS64 server and d155:af84 is hexadecimal representation of IPv4 address of chamaradisanayake.blogspot.com


Thursday, September 15, 2011

Surfing IPv4 Web from IPv6 Only Network


A user having IPv6 only connectivity limits the accessing of IPv4 resources. He can surf IPv6 Internet (i.e. Web resources having IPv6 address) and other resources having IPv6 connectivity. As of today, the percentage of Ipv4 resources on the web, is much higher than the resources of IPv6. 
 
A simple scenario to enable IPv4 surfing for IPv6 only clients is to use a dual stack proxy server (Having both IPv6 atd IPv4 connectivity). When the client request a website through his web browser, the request will forwarded to the proxy server as the browser configured to use it. The proxy server will resolve the domain name and normaly it will first check for AAAA record of the website. If it is available it will connect with its IPv6 connection and served for client. If AAAA record is not available for the website (i.e. the website is not IPv6 enabled) it will check for A record and connect it with its IPv4 connectivity.

This will support protocols like http, https, ftp etc depending on the support of the proxy server. Steps you may follow to enable such proxy server is given below.


  • Install latest OS (We used Fedora 13) and enable dual stack (IPv4 and IPv6)
  • Assign resolvable IPs 
  • Get and install Squid IPv6 support version (> Squid 3.x) http://www.squid-cache.org/Versions/
  • Compile and install Squid with required parameters (You need to enable Squid to listen on IPv6, Add IPv6 network block to enable access from clients etc )
  • Add AAAA record for your squid proxy server in your domain.
  • Assign proxy server in clients browsers


That's all.. We did that in our network and works fine..

Tuesday, September 13, 2011

Secure Your Apache Web Server


Hacking your web server is a disaster for you. Most of the times, the hacker uses the information reads from your server to attack it. (i.e. the version details, installed modules, configuration parameters etc).

So it is very essential to harden your web server and prevent publishing unnecessary information about the web server by it self.

Following given settings prevent publishing such information.

Hiding Apache Version

Impact: Exposing apache version may help to use exploits against the server.
Setting: In Apache/Httpd conf file
Methodology
  • Open your httpd.conf file using text editor such as vi:
    e.g. vi httpd.conf
  • Append/modify config directive as follows:
    • Set ServerTokens parameter at apache config file section 1 to ProductOnly
      ServerTokens ProductOnly

    • Set ServerSignature at apache config file Section 2: 'Main' server configuration to  Off
                 ServerSignature Off
  • Save and close the file. Restart Apache web server:
    • e.g. # /etc/init.d/httpd restar
Hiding PHP version
Settings: PHP configuration file (i.e. php.ini)
Note: The location of the php.ini is depending on the PHP version that you are using. Following are the possible locations
  • /etc/php.ini
  •  /etc/php4/apache/php.ini(For php4)
  • /etc/php5/apache/php.ini (For php5) 
Methodology:
Change the following option
    • expose_php Off
 Turn Off Directory Indexing

Setting: In Apache/Httpd conf file

Methodology:
Change the Option setting inside the <Directory/>___</Directory> tags to restrictive setting;

e.g.

<Directory />
    Options FollowSymLinks
    AllowOverride None
</Directory>
More details at httpd.apache.org/docs/2.2/mod/core.html#options

Good Reference
 http://www.petefreitag.com/item/505.cfm

Monday, September 12, 2011

Two Postfix Instances in One Server

Actually this was required to me to configure a server
  • to work as a mail relay for my domain say chamara.xy (External people/mail servers should send emails to someone@chamara.xy to this server)
  • to work as the submission server for my clients (someone@chamara.xy should send mail to any outside domain after authenticated by the server)
There are several mechanisms to implement this and following given are some important references;
http://www.postfix.org/MULTI_INSTANCE_README.html
http://www.howtoforge.com/forums/showthread.php?t=4788

When I reading the details I found following link (http://linuxpoison.blogspot.com/2008/02/howto-make-two-instance-of-postfix.html) which was quite easy and interesting. I configured the server referring the above document. The steps I followed is as given below;

Consider the main instance of Postfix is having its configurations in /etc/postfix
  • Copy the /etc/postfix directory and all files to another directory (Say /etc/postfix_smtp)
  • Change the parameters in the /etc/postfix_smtp/main.cf according to the new instance of the postfix
Here the spool folder should be different and should be created.
The document says Each instance of Postfix must have it's own mail spool directory.
To avoid file conflicts, the default directory /var/spool/postfix must not be shared among instances.

  • Edit the master.cf file in /etc/postfix-smtp and enable it to run on port 25
smtp inet n - n - - smtpd
  • Edit the master.cf in /etc/postfix and enable the submission port for the smtpd daemon
submission inet n - n - - smtpd
  • Edit the file /etc/postfix/main.cf and add the following near the bottom of the file:
alternate_config_directories = /etc/postfix-smtp

The above setting is required to inform the Postfix daemons about the second instance


Now you have 2 instances with 2 different configuration settings (i.e. /etc/postfix and /etc/postfix_smtp). You need to create startup scripts to both. One instance can run postfix in port 587 with relevant authentication configurations while other can run on port 25 as a mail relay server for your domain)

Add IPv6 route in Windows 7

In Windows XP you can add IPv6 route easily using the GUI provided at the network configuration.
Following given a good reference on how to set a IPv6 route in XP
http://www.microsoft.com/resources/documentation/windows/xp/all/proddocs/en-us/sag_ip_v6_pro_rt_add.mspx?mfr=true


But for Widows7 it is not that easy.. Or I was not able to add a IPv6 route as for XP through the GUI. So, I tried the command line interface to add another route (Other than the default route which is automatically configured with the IPv6 settings)

Assume you have a network 2001:df0:12:a00::/64 and
your IP is 2001:df0:12:a00::1 and
your default gateway is 2001:df0:12:a00::ffff. 
So your default route will be
::/0 --> 2001:df0:12:a00::ffff

Assume you want to add another router to forward 64:eeb9::/96 (Which is NAT64 default network) to 2001:df0:12:a00::20 (Which is the NAT64 server of the network).

Now run the command line interface as the administrator (or a user with admin privileges)

'netsh interface ipv6 add route 64:eeb9::/64 "Local Area Connection" 2001:df0:12:a00::20' 

If the command is accepted it will display 'OK'

To check the routing entries type the following command

'netsh interface ipv6 show route'

It will display all routing related to IPv6 interface.

Please note that you have to give the interface name properly which I have given here as "Local Area Connection". It depend on the network interface that you want to use for IPv6 communication. By issuing the command ipconfig /all you can see the names of all the interfaces in your PC. 


Thursday, August 11, 2011

DNSSEC without KSK

If you have not included the KSK in the zone file the latest versions of zone-singing will ended up with following error;


> dnssec-signzone: fatal: no self signed KSK's found


Not including KSK in the zone file is not the recommended way as if you not include any KSK and not provide the DS set to your DNS root, the trust anchor will not be created. Anyway if you really want to sign your zone with a self signed key (i.e. Only with a ZSK) use the switch '-P' with the zone signing command;

dnssec-signzone  -v 1 -t -P -o  xxx.abc db.xxx.abc Kxxx.abc+007+12345.key

Here -v is to set debugging level, -t is to print statics at the completion
-P to Disable post sign verification tests
The post sign verification test ensures that for each algorithm in use there is at least one non revoked self signed KSK key, that all revoked KSK keys are self signed, and that all records in the zone are signed by the algorithm. This option skips these tests.


Reference
man page of dnssec-signzone http://linux.die.net/man/8/dnssec-signzone

Wednesday, July 27, 2011

Simple ISATAP setup

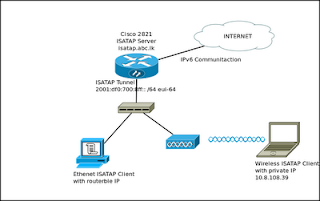
Here We have enabled ISATAP in our network to enable clients to access Internet through IPv6 communication. We have used the Cisco 2821 router as the ISATAP server and enabled Windows 7/ Windows XP clients to make tunnels with the ISATAP router (Which is the Cisco 2821 router) and get assigned a global IPv6 address.


The diagram shows an overview of the network.


Enabled ISATAP in cisco

configure terminal
!
interface Tunnel 100
ip address 2001:df0:17:8ff::/64 eui-64
no ipv6 nd suppress-ra
tunnel source 192.248.8.125
tunnel mode ipv6ip isatap
!

The ip address is the IPv6 IP address block that you are going to assign to the ISATAP clients. The first 64 bit will be the block that you define here and the remaining 64 bits will be filled as given in the RFC 5214

Use following commands to check the the status of the tunnel interface

show ip interface tunnel 100
show ipv6 interface tunnel 100

Configuring Windows 7/ XP clients

As Windows 7 is inheritance IPv6 enabled, following commands will enable the ISATAP tunnel according to the setup;

Enabling ISATAP interface

netsh interface isatap set state enabled

Check the default router settings

netsh interface isatap show router


Set the ISATAP router
netsh interface isatap set router isatap.abc.lk

Enable ISATAP in WindowsXP

First IPv6 should be enabled in the host OS using following commands

netsh interface ipv6 install

OR

you can install IPv6 using the GUI in following manner

  • Open Network Connections
  • Right-click any local area connection, and then click Properties.
  • Click Install.
  • In the Select Network Component Type dialog box, click Protocol, and then click Add.
  • In the Select Network Protocol dialog box, click Microsoft TCP/IP version 6, and then click OK.
  • Click Close to save changes to your network connection.

Reference http://www.microsoft.com/resources/documentation/windows/xp/all/proddocs/en-us/sag_ip_v6_pro_inst.mspx?mfr=true

After installing ipv6, the host is automatically enabled for isatap and 6to4 tunneling

To enable ISATAP interface and router use following commands

netsh interface ipv6 isatap set state enabled
netsh interface ipv6 isatap set router isatap.mrt.ac.lk

After setting the router, host will communicate with the router and get assigend ipv6 address from the isatap router
The ipv6 address assiged to the isatap interface has a direct relationship with the ipv4 address of the host.

Enable ISATAP in Ubuntu


The Ubuntu versions we have tested is 10.04 LTS

The isatapd deamon should be installed from apt-get install command and start the daemon with the ISATAP router parameters;

isatapd -r isatap.abc.lk &

The Ipv6 communications can be monitored using tcpdump -n ip6 command;

Following given is an observation of IPv6 communication

tcpdump -n ip6


Good references:
http://www.ciscosim.net/ipv6-transition-mechanisms-part-4-isatap-tunnels/9.html
http://www.cisco.com/en/US/docs/ios/ipv6/configuration/guide/ip6-tunnel.html#wpxref21012
http://www.microsoft.com/resources/documentation/windows/xp/all/proddocs/en-us/sag_ip_v6_pro_inst.mspx?mfr=true
http://measureofchaos.blogspot.com/2011/03/isatap-setup-on-windows-clients.html

Wednesday, July 6, 2011

BIND and Openssl

In installing BIND latest versions which has DNSSEC inbuilt support, Openssl is a pre-requirement. You can disable openssl by using the option --without opessl but it will disable the DNSSEC support of your DNS server.

When I tried to install the latest bind-9.7.3-P3 from the source, in the compilation stage I got the following error;

checking for OpenSSL... configure error "/usr/bin/openssl/include/openssl/opensslv.h" not found


I checked for openssl and found that it is available at /usr/bin. I tried to update/install openssl using 'yum' but failed with following message
Package openssl-1.0.0b-1.fc13.x86_64 already installed and latest version

Later I found 'opensslv.h' is available with openssl development package and I installed it with the command

yum install openssl-devel

It installed the required libraries for bind and I was able to compile and install bind-9.7.3-P3

Monday, June 27, 2011

Send Nagios Status Reports through a Cron Job

It will be useful for the managers to get a summarized status report of the system daily. This can be achieved through following script . The script should be listed in the crontab to execute in daily basis.

Steps (Commands should be written to the script file)

1. Generate the html version of the report automatically.
wget -v --user nagios_user --password 'password' --no-check-certificate -O ./`date +%Y%m%d`-report.html "https://your_nagios_server_URL/nagios/cgi-bin/avail.cgi?show_log_entries=&host=Host1&service=all&timeperiod=yesterday&timeperiod=24x7"

Here replace nagios_user with whoever the user having privileges to generate status report and 'password' with his password, Host1 to the host name that you want to generate report. It is better to run the command separately and check whether you are getting the html file correctly. If everything is fine you will get a a html report with the date
i.e. 20110627-report.html

If you have no idea how to get the https:// .... code part, just put a tail -f for the http access log of the server (nagious) and generate the report from the nagios GUI. The required code to generate the report will be on your screen.

Here my nagios is running on https://..So I need to put a tail -f for /var/log/httpd/ssl_access_log and generate the required report from the nagios GUI.

Get the code and replace it with the code above.


2. Copy this file to a temporary file named rep.html
cp `date +%Y%m%d`-report.html rep.html

The temporary file will be useful for HTML altering purposes with sed command.

3. Convert HTML file to PS2
/usr/bin/html2ps -U rep.html > rep.ps

4. Convert ps file to PDF version
ps2pdf rep.ps report`date +%Y%m%d`.pdf
This will create a pdf file with the name report-yyyymmdd.pdf

5. Mail the content to the appropriate user
nail -a reportyyyymmdd.pdf -s "Nagios Report" admin@your_domain


Now the script file should be called through a cronjob
If you wish to set the cron job to a user, login to the system as that user and type the command crontab -e which enables him to edit the cron jobs

Put an entry related to the cron job
15 00 * * * /home/user/scrip.sh
Here the scrip.sh is the file you have all commands related to nagios report generation + emailing parameters

Save and exit from the crontab edit mode.
Make sure the user has the privileges to execute the file 'script.sh'

Friday, June 24, 2011

Nagios Authentication with LDAP using Apache Module mod_authnz_ldap

Nagios basic authentication mechanism is htpasswd. The password file is defined at /etc/httpd/conf.d/nagios.conf

AuthUserFile /usr/local/nagios/etc/htpasswd.users

I tried to authenticate users from the LDAP server to enable centralized user authentication.

Here I have used authnz_ldap_module in Apache to authenticate users for Nagios system.
My apache version Apache/2.2.14 (Unix) and Nagios 3.2.3

First of all we need to have the apache module build with apache. Check /etc/httpd/conf/httpd.conf for the following entry.
LoadModule authnz_ldap_module modules/mod_authnz_ldap.so

If your apache is not compiled with authnz_ldap_module, follow the link and enable authnz_ldap_mod support in apache. Normally, this module is available apache version 2.1 and later
http://www.muquit.com/muquit/software/mod_auth_ldap/mod_auth_ldap.html

Here are the parameters that I configured in /etc/httpd/conf.d/nagios.conf

SSLRequireSSL
Options ExecCGI
AllowOverride None
Order allow,deny
Allow from all
AuthName "Nagios Access for LKNIC"
AuthType Basic
AuthBasicProvider ldap
AuthLDAPUrl ldap://[ldap_server_ip]:[lapd_port]/[Base_DN]?[searching_parameres i.e. uid etc]
Require valid-user


The entries in BOLD is related to the LDAP authentication. I have allowed all LDAP users to nagios system as I have configured 'Require valid-user' setting in the nagios.conf. User restrictions can be done referring http://httpd.apache.org/docs/2.2/mod/mod_authnz_ldap.html#usingtls

By enabling SSLRequireSSL in the configuration I have set the HTTPS connection for nagios. With this settings nagios is accessible only with https://server.url/nagios

Even though I have enabled all LDAP users to visit the nagios system, the user levels are defined at the cgi.cfg at /usr/local/nagios/etc/
E.g.
authorized_for_system_commands= user1, user2, etc..
authorized_for_read_only=user3

Hope this will help you to configure central authentication for Nagios

Useful reference:
http://httpd.apache.org/docs/2.2/mod/mod_authnz_ldap.html#usingtls
http://www.linux.com/archive/feature/120050

Monday, June 20, 2011

MySQL DATE_SUB Function

If you are using a database as the back-end, programmers needs to access data from the databases (i.e. MySQL) and process them before display information to the clients. For example if you have date of Birth (dob) in a database table column, you need to read each dob from the table and calculate the age inside your coding.
If you are using MySQL, it allows you to do small calculations with your queries.

DATE_SUB / DATE_ADD are very useful MySQL functions which reduce more coding in your program.

Following given is one example of using DATE_SUB function.

$query = "select customer.name as name, orig_date from where orig_date > DATE_SUB(CURDATE(),INTERVAL 7 DAY)
This will display the records created within one week time

Good Reference
http://dev.mysql.com/doc/refman/5.5/en/date-and-time-functions.html

Monday, June 13, 2011

IP Tables DNAT and IP Forwarding

We had a requirement to forward all mails coming to mail server port 25 to the virus scanner port 25. We created DNAT on the IP tables to enable Pre-routing.

-A PREROUTING -s virus_scanner_ip -p tcp -j ACCEPT
-A PREROUTING -s my_network -p tcp -m tcp --dport 25 -j DNAT --to-destination virus_scanner_ip

The first rule to accept whatever connections from the virus_scanner to the mail server and the second rule to forward all connections to virus_scanner . The interesting thing here is the network defined in the second rule includes the virus_scanner_ip as well, but due to the first rule, the routing loop will not be created.

We enabled this and configured virus_scanner to route all packets via mail server. This is a must as the client accept the session only with the mail server.

The other important fact is to enable ip forwarding on the mail server.( This is a must as the mail server forwards all requests from clients to the virus scanner.)

Please refer following documents for further details;
http://www.ducea.com/2006/08/01/how-to-enable-ip-forwarding-in-linux/ - IP Forwarding
http://linux-ip.net/html/nat-dnat.html - DNAT and Pre Routing

Monday, June 6, 2011

IP ROUTE2

This is much interesting topic related to policy based routing in Linux. I have used this mechanism in a firewall (linux) with 3 Internet connectivity from 3 ISPs.
Use following link for more details.

http://www.policyrouting.org/iproute2.doc.html

Thursday, May 26, 2011

Short & Sweeet

Under this topic I would like to state some useful tips in services and systems. Hope this will be a huge collection on commands/shortcuts one day...

  • Finding the DNS bind version of a DNS server
  • Command: dig version.bind txt chaos @dnsserver_ip
  • Stop displaying BIND version to outsiders in version.bind query
  • Just insert ' version "whatever you wan't to display for version queries"; ' to the options{}; E.g. options { directory "/var/named"; version "< HIDDEN >"; };
  • Display the directories (folders) in Linux
  • There are few ways of doing this in Linux.
    • ls -d */
    • This will display the directories in the current working directory
    • tree -d
    • This will list the directories in tree structure
    • echo */
    • This also displays the directories in a line. For example you can give the location as echo /home/* (which lists all the home folders of the users.)
  •   Accessing Zipped/Tar contents in Linux 
         Processing a .tar or .zip file, without decompressing it, is required in many occasions. Following commands are useful to extract data from a compressed archive.
    • tar -t
    • This will display or list the files/directories in the compressed archive.
    • zcat file1 | grep -e "test"
    • This will list all lines containing 'test' in the archived file file1. Similar to gunzip -c
       
File Contents filtering
    • cut 
                Very useful command to display the fields of a file.

    • grep
Few of very rare commands
Following commands are very rarely used but useful. Check whether you are familiar with them
  • ss
       This is very similar to netstat -nr but gives more information
  • pstree
  • This will display all the processes running currently along with associated child processes in tree format 
  • space
  • Space is a command which can be used to cheat history command. If you type the command with a space before the command, that command will not be listed with history command
Useful commands to 
  • check changed files in a directory (including sub directories) within a week and save details in to a file
find /path/to/the/directoty -mtime -7 -ls > changed_files
  • remove unwanted contents and send the details to someone
sed '/contents_to_be_removed/d' changed_files | nail -s "Changed files" -c cc_to@yourdomain someone@yourdomain
     
Here the 'find' command will list the files changed within a week time in the given directory and its subdirectories and the details will be written to the changed_files file. Later if you identifies any unwanted data in the listed file details, you can delete using 'sed' command the the patten of the content which should be deleted. The 'nail' command can be used to send the filtered content to someone and -c switch can be used to cc the mail to some other mail recipient.


Good reference

    Wednesday, May 25, 2011

    IPv6 in Fedora

    We have configured a DNS server to run both IPv4 and IPv6 (Dual Stack). The configuration steps were as follows
    1. Enable IPv6 Address

      • Settings in the /etc/sysconfig/network-scripts/ifcfg-eth0
      • Add following parameters to the file
        IPV6INIT=yes
        IPV6ADDR=
        IPV6_DEFAULTGW=


      • Restart the network
      • /etc/init.d/network restart


      • Check new settings
      • Use command ifconfig


      • Use network utility tools to check the data transfer in IPv6
      • traceroute6 gatewayip

        ping6 gatewayip

        tcpdump -n ip6 ....


    2. Configure DNS (BIND) to listen on IPv6 address as well

      • Edit /etc/named.conf with following parameters
      • listen-on-v6 port 53 { ipv6_address_of_the_server;};

        allow-query { 0.0.0.0/0; ::/0;};

        Note: If this is a caching DNS server for all, above settings are ok, else configure 'allow-query' with your network settings


    3. Enable firewall
      • Edit /etc/sysconfig/ip6tables

      add rules as you did in iptables

    Good references
    http://www.cyberciti.biz/faq/rhel-redhat-fedora-centos-ipv6-network-configuration/#comments
    http://www.sixxs.net/wiki/IPv6_Firewalling

    Wednesday, May 18, 2011

    Postfix Error - Virtual Mailbox Base

    bad string length 0 < 1: virtual_mailbox_base

    I got following error in Postfix main server which was used as a in-relay for few domains. The in-relay used to route all relay domain mails to virus scanner without putting them in to any mail box. It also had virtual domains settings;
    virtual_mailbox_domains = xyz.lk
    virtual_alias_maps = hash:/etc/postfix/virtua

    The error I got is as follows;

    fatal: bad string length 0 < 1: virtual_mailbox_base =
    May 19 11:18:38 malithi postfix/master[2473]: warning: process /usr/libexec/postfix/virtual pid 28307 exit status 1
    May 19 11:18:38 malithi postfix/master[2473]: warning: /usr/libexec/postfix/virtual: bad command startup -- throttling

    I followed several posts regarding the virtual_mailbox_base. Following post give a good understanding on virtual_mailbox_base issues;

    http://archives.neohapsis.com/archives/postfix/2008-02/0898.html
    http://readlist.com/lists/postfix.org/postfix-users/20/100947.html

    What I found was as I have configured virtual settings in master.cf it looks for virtual_mailbox_base parameter even-though I have not used any virtual transport. I commented the virtual settings in master.cf

    #virtual unix - n n - - virtual

    It stopped the error regarding the virtual_mailbox_base and worked fine.

    May be this will useful to you in your postfix configurations and error corrections.

    Thursday, April 28, 2011

    Mailing file contents though command line

    You may know this but I feel it is bit useful as it provides a way to send important data in a file to your mailbox while working in a Linux server and you are so busy to copy and paste content in the mail body.

    Command:

    cat "file you required to send content" | /bin/mail -s "Subject" user@your.domain

    Attach file in command line

    Attache a file can be done in several ways;

    I have used 'nail' command to attache a file and send to a user

    Command is as fellows

    cat "file you want to include as the body content" | nail -a -s "Subject" user@=usersdomain

    Tuesday, March 29, 2011

    SSL Certificate Generation in Fedora

    If you are using TLS for your web/mail server you need to generate a certificate for the server. SSL certificates can be generation using openssl command;
    Following given a sequence of command that I have executed to generate a .key, a .csr and a self signed certificate .crt.
    1. Generate the private key
    2. openssl genrsa -des3 -out server.key 4096 When generating the private key it will prompt for a pass phase; Enter a pass phase for security purposes. This pass phase is required in many situations including service restart. If you feel this is too much.. You can disable the pass phase later (As given below)
    3. Generate the certificate request (i.e. .csr)
      openssl req -new -key server.key -out server.csr
      This request can be forwarded to the CA to generate a certificate


    4. Generate the self signed certificate using above generated csr and .key
      openssl x509 -req -days 365 -in server.csr -signkey server.key -out server.crt
    5. If you want to remove the pass phase of the .key file use following command
      openssl rsa -in server.key -out server.key.insecure
      This is done because if the .key file needs a phase phase to use, whenever the service is started the pass phase will be prompted. In some services, there is a configuration parameter to hard code the pass phase. If it is set, it will be used by the service whenever required (I have noticed this scenario in dovecot 

    If you want to view the contents of a pem format file use the following command
    1. openssl x509 -text -noout -in server.pem

    Verifying the certificates and private keys

    Certificate (.crt):
    openssl x509 -noout -modulus -in server_certificate.crt | openssl md5

    Certificate Request (.csr):
    openssl req -noout -modulus -in server_certificate_request.csr | openssl md5

    Private Key (.key)
    openssl rsa -noout -modulus -in server.key | openssl md5
    You need to compare the outputs (MD5 Hash) of the above commands and check the validity.

    PKCS12 file (.p12)
    openssl pkcs12 -info -in keyStore.p12


    Worth read:
    http://goodsarves.blogspot.com/2011/03/creating-certificate-authorities-and.html
    http://www.sslshopper.com/article-most-common-openssl-commands.html

    Tuesday, March 15, 2011

    Add Grub Password After Linux Installation

    Setting a grub password after installing Linux OS is as follows;
    • login as root and execute 'grub' command in terminal/konsole. prompt will change to 'grub>'
      execute md5crypt to generate password hash.
    grub> md5crypt
    • it will prompt you for password, enter the password which you are going to set for GRUB. it will display encrypted password hash.
    Password: ******
    Encrypted: $1$jxcdN0$hVHViq1aiPf8FziuGJGZp0
    • Note down encrypted password hash and exit grub mode:
    grub> quit
    • edit /boot/grub/grub.conf file and insert encrypted password in between "splashimage" and "title" lines.
    E.g.
    splashimage=(hd0,0)/boot/grub/splash.xpm.gz
    password --md5

    title Fedora X
    Reference:
    http://www.linuxforums.org/forum/red-hat-fedora-linux/69395-add-grub-password-after-installation.html

    Monday, March 14, 2011

    chroot for BIND 9

    There may be permission issues when using bind-chroot

    Example log entry in the named log file:

    general: error: dumping master file: tmp-tAj6kdgzCl: open: permission denied
    xfer-in: error: transfer of 'lk/IN' from 192.248.8.17#53: failed while receiving responses: permission denied

    The issue is due to permissions in the bind directories

    Set the permissions as follows

    chmod 755 /var/named/
    chmod 775 /var/named/chroot/
    chmod 775 /var/named/chroot/var/
    chmod 775 /var/named/chroot/var/named/
    chmod 775 /var/named/chroot/var/run/
    chmod 777 /var/named/chroot/var/run/named/

    Good reference:
    http://hostechsupport.com/forums/showthread.php?620-Install-A-Chrooted-DNS-Server-%28BIND9%29

    Monday, March 7, 2011

    IP Route2 - Advanced routing for Linux

    We can use a Linux box as a advanced routing device by using iproute2 features. We have used a gateway server cater 3 ISP Internet connections. It supports policy based routing, load balancing etc.

    Good reference
    http://www.linux-tutorial.info/modules.php?name=Howto&pagename=Adv-Routing-HOWTO/index.html
    http://www.policyrouting.org/iproute2.doc.html

    Useful commands
    Create a table
    /sbin/ip rule add from a.b.c.d/n table 200
    Add routes
    /sbin/ip route add x.x.x.x/n2 via gateway_of_eth0 dev eth0 table table_number
    E.g.
    /sbin/ip route add 10.168.0.0/24 via 192.168.8.30 dev eth2 table 200

    Adding a default rule
    /sbin/ip route add default via gateway_of_eth2 dev eth2 table 200

    Display routing table
    ip route show table table_name